E2.4 Explain how protractors work, use them to measure and construct angles up to 180°, and use benchmark angles to estimate the size of other angles.
Skill: Explaining How a Protractor Works
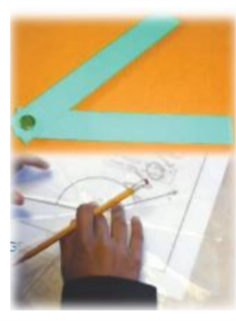
Students learn to estimate angle measurements in degrees and to determine these measurements using a protractor. Many students initially have difficulty placing the protractor correctly over the angle they want to measure and using the correct scale to read the measurement. Providing students with a variety of activities that require the use of a protractor is essential to help them develop this skill (for example, constructing angles and triangles of given measurements).
Source: translated from Guide d'enseignement efficace des mathématiques de la 4e à la 6e année, Géométrie et sens de l'espace, Fascicule 1, p. 27.
Only when students have had many experiences identifying, comparing and measuring angles using non-standard measurements and benchmarks will they be ready to construct various types of angles using tools such as the protractor. This is a confusing tool for many junior students because the units are small (degrees) and written in very small print. In addition, most protractors have two sets of numbers. For these reasons, it is best for students to practice using a protractor with larger units first. For example, students could construct a transparent protractor by folding a piece of waxed paper in half, then in half again, and in half once more. With this modified protractor they can measure angles by counting the number of wedges.
After many experiences using the protractor they made, students can compare it to a standard protractor and make connections as to how it might work.
Source: translated from Guide d’enseignement efficace des mathématiques de la 4e à la 6e année, Géométrie et sens de l'espace, Document d'appui, Fascicule 1, p. 19-20.
In Grade 5, students are expected to know the parts of a protractor, namely the zero line and the point of origin of the protractor (the midpoint of the protractor where all the degree angles meet).
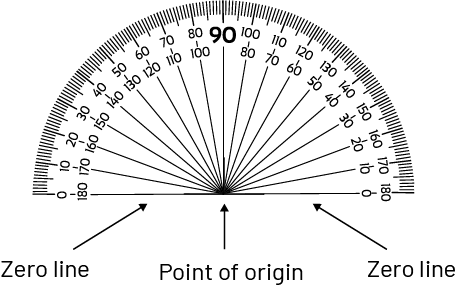
To measure an angle using a protractor, students must align the point of origin of the protractor with the vertex of the angle. They must then align the zero line of the protractor with one of the segments. Then, they can read the measurement of the angle clockwise or counterclockwise, depending on the position of the angle.
Source: adapted and translated from En avant, les maths! 5e année, CM, SDE, p. 3.
Skill: Using a Protractor to Measure Angles up to 180°
When using a protractor, it is important to observe the following guidelines.
- Make sure that at least one side of the angle extends beyond the protractor.
If the line rays that make up the angle are too short for the size of the protractor, they should be lengthened, using a ruler to make straight lines by extending the sides of the angle. - Estimate the measurement of the angle.
Observe the angle to determine if it is acute or obtuse, and then decide on an approximate measurement that will be used to select the scale on the protractor and to check the reasonableness of the final measurement. - Place the zero line on the initial side of the angle. Make sure the point of origin lines up with the vertex of the angle.
- Read the measurement, in degrees, by locating where the scale and the second side of the angle overlap.
- Check the measurement with the estimate.
- Make sure that the measurement found corresponds to the estimate you made.
Very Important!
During the exploration of angles, common student errors are related to misconceptions around representations. Some students believe that the angle gets larger if the rays representing it are drawn longer because the opening looks wider.
Source: translated from L'@telier - Ressources pédagogiques en ligne (atelier.on.ca).
Example
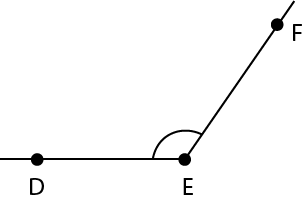
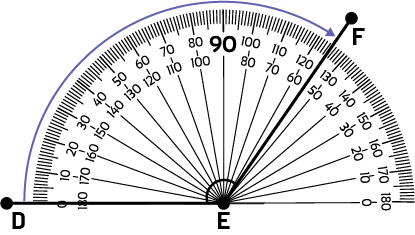
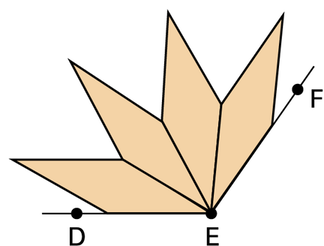
I place the point of origin of the protractor on the vertex E of angle DEF. I align the zero line of the protractor on segment DE. I read clockwise from point D, 0°, to point F. I read the measurement that coincides with segment EF, that is 125°.
Source: translated from En avant les maths!, 5e année, CM, Sens de l’espace, p. 11.
Skill: Using Reference Angles to Estimate the Magnitude of Other Angles
In the junior grades, students must learn to use a variety of estimation strategies in increasingly complex situations using both non-standard and standard units. It is important, therefore, that teachers plan supports and guided instruction focused on specific estimation strategies. Van de Walle and Lovin suggest instruction in estimating strategies. One of these refers to the use of benchmarks.
|
Strategy |
Example |
|
Develop and use benchmarks that represent important units. Students who have built up a repertoire of benchmarks and who use them regularly are more successful and comfortable estimating. The estimation of the measurement of an attribute is done by comparing it to a benchmark. |
To estimate the measurement of a given angle, students can use the right angle and the flat (straight) angle as benchmarks. By mentally superimposing the image of these angles on the given angle, they can conclude that its measurement is much closer to 90° than to 180°. They then estimate that the measurement of the given angle is about 100°. 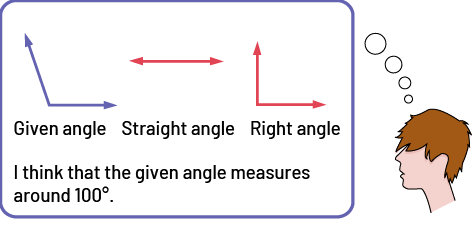 image In a rounded rectangle, there are three angles: a given angle which is formed by a short vertical line and a short diagonal line to the left, a flat angle, and a right angle. At the bottom of the rectangle is labeled: I believe that the given angle measures about one hundred degrees. Outside the rectangle, there is a character. image In a rounded rectangle, there are three angles: a given angle which is formed by a short vertical line and a short diagonal line to the left, a flat angle, and a right angle. At the bottom of the rectangle is labeled: I believe that the given angle measures about one hundred degrees. Outside the rectangle, there is a character. |
Source: translated from Guide d'enseignement efficace des mathématiques de la 4e à la 6e année, Mesure, p. 18-19.
Examples - Estimating Angle Measurements and Comparing Angles Using Reference Angles
I know that a right angle is 90°. I also know that a square has four right angles. So, I can use an orange pattern block in the shape of a square to determine if the angle is greater than, less than, or equal to 90°, and to then help me estimate its measurement.
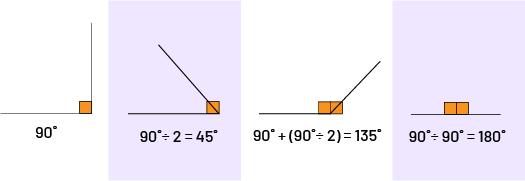 image There are four different corners. The first two have a geometric tile mosaic in the corner. The last two have two geometric mosaics in the shape of a tile in the corner. Under the first angel is written: 90 degrees. Under the second corner is written: 90 degrees divided by two equal to 45 degrees. Under the third angle is written: 90 degrees plus ( open parenthesis) 90 degrees divided by two ( close parenthesis) equal to 135 degrees. Under the fourth image is written: 90 degrees plus 90 degrees equals 180 degrees.
I use known angles to estimate angle measurements. I know that the smaller angle of the beige rhombus is 30°. I superimpose that angle on the given angles to help me estimate them.
The angle DEF is an obtuse angle because it is greater than 90°. I estimate its measure to be 120°, because it corresponds to about 4 × 30° or 30° + 30° + 30° + 30° = 120°.
Source: translated from En avant, les maths!, 5e année, CM, Sens de l'espace, p. 5-7.